Tiling a shower is one of those home improvement projects that can help to give your home that customized look and makes you feel pampered. A tiled shower adds beauty and durability and value to your home. Taking the project on by yourself can see daunting at first but tiling a shower is similar to tiling a floor. You need to file these steps to tile a shower all by yourself. You will read the basic steps to properly prepare a leak proof shower.
Steps to Tile a Shower:
1.) Preparation to Tile a Shower
You need to put a sturdy cement board backer. Putting up this is just like putting up drywall. You need to cut it to fit, and then screw it to the studs. Leave about 1/8 inch gap between the panels and a very small space between the shower pan and the bottom of the backer so that the two don’t squeak by rubbing together.
- You need to a hole saw to cut the holes where the shower head and handles will come through.
- Then make the cement board flush with the tile of your shower pan by using shims behind the board to bring it out to the desired thickness.
- You need to use 100% silicone caulk to seal the seams between the panels to tile a shower.
2.) Feather Edges and Paint Primer to Tile a Shower
Feather any edges with speckle where the backer board meets the wallboard. If you find there is a gap between the backer board and the wallboard, you will need to speckle and then feather the gap so that it appears as one continuous back.
- Then paint the primer onto any speckle over which you intend to tile. After when you have feathered the edges to remove the gap, apply the high-quality exterior over the feathered wallboard and backer. You will not get good adhesion if you apply thin-set mortar over speckle.
3.) Layout to Tile a Shower
You need to mark your tile layout on the substrate and mark out. If your shower walls are not perfectly square, or you are planning to install accent tiles then the layout of these tiles becomes important to tile a shower. Measure up from the bottom of the backer board the height of a tile minus 1/2. This will give you a ½ overlap over the tile lip on your shower pan. Mark this with a sharpie for using a level, then transfer the mark across the shower stall. This will be a guide for the top of the first row so that all tiles will be in the level.
- Or you can use another way to plan out the first row of tiles is to measure the high part and low part of the shower pan. Make the low spot a full tile and mark it. then cut the tiles on the high side down to the level of the uncut tile on the low side.
- Then keep grout lines away from the inside corner of the enclosure, it can prevent the need for tiny tiles and poor grout joints.
4.) Mix and Apply Mortar to Tile a Shower
If you want your thin set to be the consistency of the peanut butter, not too thick or it will dry too soon or not too thin or you will have a hard time setting the mortar with the strength and cleaning. You can use an electric drill and an auger to mix your thin set mortar. This will give you even consistency and ultimately a better product to tile a shower.
- Then dampen the cement board with a sponge before applying the mortar. If you will not then cement board will draw the moisture out of the thin set too quickly and make a brittle set which will be susceptible to cracking.
5.) Apply Mortar on the Back on the tile
Apply some thin set of the cement at the back of the tile and spread it with a notched trowel. This process is known as back buttering and usually more effective than troweling the mortar directly on the backer board and then setting the tiles on top of that. It is cleaner too.
- Be sure to not to apply too much or mortar at the back side of the tile. A thin layer of mortar is enough. More is not necessary when it comes to thin set.
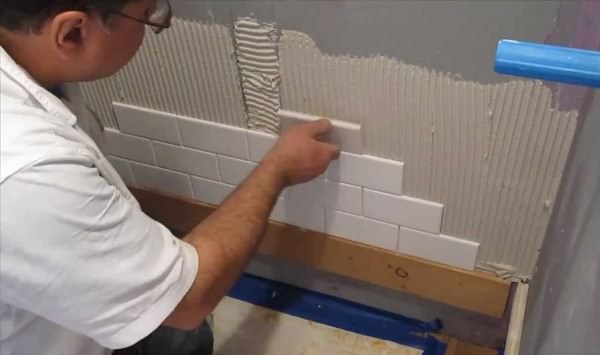
6.) Set the First Tile to Tile a Shower
If you will set the first tile in the middle of he wall, this will create a pleasant visual effect and allow each tile which is placed beside it on the either side seem centered. After the back buttering, you will need to simply press the tile onto the backer board and, then apply the pressure to make sure that mortar adhered properly to both the tile and the backer board.
- Then wipe away an excess thin set of mortar after pressing the tile onto the backer. Although You will caulking and grouting between the tiles, it is best not to leave any thin set on oozing out from the sides of the tile. You just need to simply wipe away excess thin set with your finger.
- You can use small shims or other spacers to allow a small amount of space between the bottom of the tile and the lip of the shower pan. A small piece of cardboard works great as makeshift shims. When the mortar will get set you can just simply remove these shims and caulk between the lip of the pan and the bottom of the tile.
7.) Continue Laying the Tile
Continue laying the tile and make sure to use spacers in between the tiles. Spacers will leave you identifiable grout lines between the tiles. Small 1/16 or 1.8 spacers or even big can be placed several places on the x and y-axis of the tile to leave the adequate space for an even grout line.
8.) Repeat the Procedure to Tile a Shower
Repeat the procedure, setting each row of tile on the top of the last row of tile and continue until you can reach the top of the shower stall. The measure up from the top of the last row. Mark the line with a level as a guide for your next row. Spread thin set on your tiles with v notched trowel and place the tile just below the marked line. Use spacers all around. Then let the tile set for about 48 hours. This will make sure that the mortar has adhered properly to both the tile baking and the cement board breaker.
9.) Grout the Tile
Mix the batch of grout and lightly wet the area where you are going to grout with a damp sponge and dump a bit of grout onto the area. Use a rubber float to smooth it into the joints and attack each pint at a diagonal angle. Then after 30 to 40 minutes, you will need to wipe the excess grout with a damp sponge in a circular motion. Keep wiping with a clean sponge until the tile gets clear.
Let the grout get a cure for approximately 3 days before sealing. Then seal the grout and run a thin bead of aerosol grout or liquid grout onto the grout line and then wipe away. Let it dry and then test its water resistance by dropping water onto the sealed grout. Correctly sealed grout will cause the water to bead up on the top of it. You can also read how to clean grout?
10.) Caulk any Needed Areas
When you caulk, remember to pull the caulk gun quickly across the joint. Most amateurs caulk too slow and ed up by dropping too much caulk down on the joint.
- Keep the tip angled as you run the bead along the joint.
- Always match the speed with which you pull the caulk gun trigger with the rate at which you pull the gun along the joint. You don’t need to pull the gun as fast by triggering slowly or fast.
- When you will finish to apply the caulk bed it by running a damp finger across the bead with the light pressure.
Tips
- Always remember that you are not going to grout at the corners, you are going to caulk there so try to keep an even spacing.
- Wiping off the grout with a damp sponge when it is not quite dry helps to make the grout lines smooth and saves tedious scraping later.
- Make sure to not use wall tiles on the floor, but floor tiles can be used on walls.
- Don’t use mastic. Use a thin set and stay away from the premixed stuff.
You can also have look at how to remove wallpaper?


")


