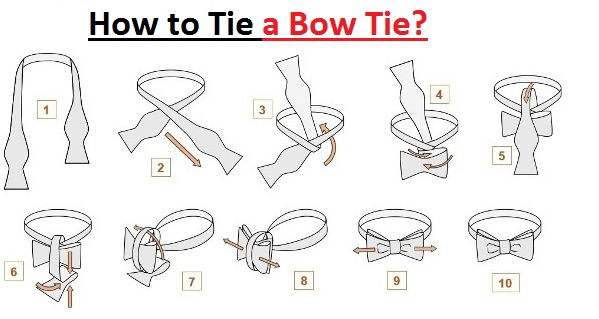
Neckties not only enhance the formal look, in fact, it makes the person more sober and elegant. Whether it is tuxedo or a normal shirt tie can be worn on all apparel. Though necktie has become old-fashioned but they will be never out from the fashion. However, if you are bored with normal tie look and want to try something different and fashionable than try your hands on bow tie. It is different from the usual tie. It gives a more dapper look and will definitely make you stand out among all. There are many types of a bow tie. Some of them we have listed below. But in this article, we will concentrate on a simple bow tie. Here are the steps to tie a bow tie.
Types of Bow Tie:
- A Big Knot Tie
- Single End Bow Tie
- A twisted Knot
- Butterfly Bow Tie
- Batwing Bow Tie
 Steps to Tie a Bow Tie:
1.) Drape the Bow Tie around Your Neck
Before starting to tie the bow tie, choose a correct tie that suits with the garment you are going to wear. Then wear your shirt. It’s your choice whether you want to button the first button or leave it to unbutton. However, if you button up you will get a classy look. Lift your collar up and drape the bow tie around your neck. While doing so stand in front the mirror to avoid all the glitches. Once you are done with it, its time to move on to next step.
2.) Cross the Long Side
Once you have drape the tie around your neck, make sure that one end that could be left or right should be longer than the other end. Once you have done this then cross the long side over the another end. Clasp it neatly near the front of your neck. The best thing about a bow tie is that they have remarked neck measurements that indicate how you can size them. Moreover, do not tie it loose otherwise, your tie will dangle, which will not look nice and neat.
3.) Make a Loop to Tie a Bow Tie
Once you have place the longer side over the shorter end, make a loop. Be sure that the loop is formed in the center that is just underneath your chin. Feed the longer side of the tie up and beneath the loop created by the crossover. In this way, you will get a single knot. To avoid any confusion place the longer end on your shoulder so that you do not mess up while tying a bow tie.
4.) To Make Bow Use Shorter End
Grasp the other end of the bow tie to create a loop in a horizontal way. Then it will look like a bow toe however, there will be no center knot. Hold the bow in a loose form, keeping enough space to form the knot. For doing so you can keep your finger at the back of the knot as a placeholder to complete the bow tie look.
5.) Drape the Long Side to Tie a bow Tie
After making the loop take the longer side of the tie and drop it on the front of the bow. This will become the second layer of the bow tie.
6.) Hold Both the Ends Altogether to Tie a Bow Tie
After draping the longer side, grasp both the folded sides of the ends horizontally. Pinch both the ends altogether in front the end that is dangling. The upper part of the dangling end will now be secured between the two.
7.) Drop the Middle of the Dangling End from the Knot
After holding both the ends altogether there will be a visible space behind the loop. Fold the end of the bow which you have dropped. Complete this like you did the short end. Then pull the loop from the fold and hole. Now you will get a back half of your bow tie.
8.) Pull The Loops to Tie a Bow Tie
To complete the entire process of tying the bow tie, pull the loops. Make sure that you pull only at the looped portion, if you will pull it from the flat ends then your whole hard work of tying a bow tie will go in vain as this will untie the bow.
9.) Make the Bow Tie Straight
Once you have pulled the loops of the bow tie, it’s time to straighten it. To get the proper position you can twist the loop from the front and back of the bow. For this, you will have to pull the flat ends. However, be cautious while doing so. At last, don’t forget to reposition it before tightening the loop.
10.) Lower Your Collar
Your bow tie is ready now you can pull down your collars down. Remember you lifted your collar up to in the beginning? Now you can place it down and you are ready for the event. Be sure that your tie is tight and correctly positioned.

