How to straighten hair at home? Twists and waves are fun and energizing, however, might be tricky to keep perfect at times. So on the off chance that you are in the mind-set to switch up your look, try straightening your hair! Numerous individuals are hesitant to straighten their hair because they are perplexed about bringing on harm, however, with the best possible supplies, products and techniques, you can achieve an astounding straight look without devastating your hair. To properly straighten your hair, utilizing either straightening irons or a hair dryer, just take over the steps beneath:
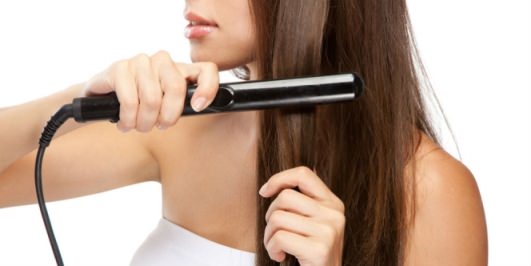
(A) Use Straightening Iron to Straighten Hair at Home
1.) Wash and Blow Dry to Straighten Hair at Home
Straightening your hair works best on crisply washed or day-old hair. At the point when washing your hair, tailor your shampoo and moulding products for your hair type. For thick, frizzy hair, utilize a smoothing shampoo and conditioner. If your hairs are flat or thin then you can use Voluminous products. When hair is washed, give it a speedy towel dry, then blow-dry with a hair dryer. This will act as an initial pre-straightening base of your hair.
- Dry the roots of your hair with the hair dryer first and foremost, then work through the lengths of your hair.
- Turn your head upside down while drying to add more volume.
- Utilize a paddle brush to work through the tangles and hold hair taut as you dry.
2.) Apply Heat Protection Spray to Straighten Hair at Home
Putting resources into a good heat protection spray which you apply every time you straighten is one of the best things you can accomplish for your hair, without renouncing straightening through and through. The heat protection spray secures moisture and keeps hair from getting to be dry and fatigued. Apply the heat protection spray equitably over dry hair, holding the can around six inches away from your head.
Don’t apply the heat protection spray to your roots, as this can cause them to look oily.
Heat protection sprays could be found in most medication stores and hair salons. It may be worth putting resources into a brand name product which will improve the work of ensuring your hair. Try approaching your hair beautician for suggestions.
3.) Divide to Straighten Hair at Home
Divide your hair into sections to straighten them. Partitioning your hair into sections will ensure that you straighten your hair properly, without missing any strands. The simplest way to section your hair is to divide it into three layers.
Create the first layer by taking the front sections of your hair and scooping them back with your thumbs to snatch the majority of the hair on the crown of your head. Separate this layer by turning it and securing it with a hair tie or butterfly clip.
Create the second layer by gathering up the hair that the remaining parts over your ears and securing with a hair tie or clip.
The third layer comprises of any hair which stays unclipped, which ought to be the hair at the back of your head, developing around the scruff of your neck.
On the off chance that you have thick hair, you can divide your hair into extra layers. On the off chance that you have thin or fine hair, you may not need to divide the hair whatsoever, or you can just part it into two sections.
4.) Right Temperature to Straighten Hair at Home
Set your straightening iron to the right temperature for your hair type. Reliable and superior quality hair straighteners give you the choice to adjust the temperature of the irons. Utilizing the right temperature for your hair will ensure you get the best results and will keep you from doing unnecessary harm to your hair. The temperature your straightener ought to be set to will rely on upon your hair type.
Fine or harmed hair ought to utilize a temperature of somewhere around 200 and 300 °f (93-149 °c).
Hair of normal thickness, which is in really good condition ought to utilize a temperature of somewhere around 300 and 350 °f (149-177 °c).
Thick or coarse, frizzy hair ought to utilize a temperature of 350 to 400 °f (177-205°c).
5.) Use the Right Technique to Straighten Hair at Home
Straightening your hair with a straightening irons does not include anything exceptionally entangled, yet there are various useful tips you can follow to achieve the best results:
Utilize the right size strands. Straightening your hair in strands which are 1 to 2 inches wide and close to a large portion of an inch thick will ensure best results. On the off chance that you utilize sections that are much greater, your hair won’t straighten properly, yet in the event that you utilize smaller sections, it will take excessively long.
Hold the hair taut. Utilize one hand to hold the section of hair taut as you brace the straightening iron around it and smooth it through the hair. On the off chance that it’s not completely straight the first time, don’t stress, just draw the straightener through once more.
Start straightening about an inch away from the roots. This will ensure that a little volume is left in your hair and verify it doesn’t look excessively flat.
Use smooth instead of jerky developments. Try to run the straightening iron over the hair in one smooth, liquid development. In the event that you move it jerkily, you will wind up with flat lines over your hair.
6.) Stop if You See the Steam to Straighten Hair at Home
Stop on the off chance that you see any steam or your hair begins to sizzle. On the off chance that this happens, it implies that your hair is not completely dry. Stop, turn off the hair straightener and utilize a hair dryer to get your hair completely dry before you continue straightening. Utilizing a straightening irons on damp hair is extremely harming and will leave your hair in awful condition, so dodge at whatever point conceivable.
7.) Straight from Bottom to Straighten Hair at Home
Straighten the last layer of hair first to straighten hair at home. When you have straightened the bottom layer of hair, unclipped the following section and start to straighten it utilizing the same technique as in the recent past. The top layer of hair ought to be the last section of hair you straighten.
8.) Use Mirror to Straighten Hair at Home
Examine your work in a mirror to verify you didn’t miss any sections. It might be barely noticed a strand or two all through the straightening methodology. Remember to check the back. In the event that you recognize any waves or crimps, just head over them with the straightener one more
You can check the back of your hair by remaining with your back to a mirror while you hold a second mirror in your grasp. You ought to have the capacity to see the impression of the back of your head in the handheld mirror.
9.) Hold the Straightening Iron Correct to Straighten Hair at Home
You may need to position the straightening iron in a certain way to get it out of your face or to help it style a certain way. Turn the iron somewhat when you get to the end of each one strand to create little flicks at the bottom.
It’s exceptionally essential to do these touch ups before applying any finishing products because some styling products, (for example, hairspray) are combustible and can burst into flames under the heat of a straightening iron.
10.) Use Finishing Product to Straighten Hair at Home
You can utilize a silicone-based serum to add some extra sparkle. Alternatively, to hold your hair style, you can use a hair spray. Try to avoid adding any water-based or mousse product as this will dampen the hair and cause it to turn wavy.
(B) Use a Hair Dryer to Straighten Hair at Home
1.) Wash Your Hair to Straighten Hair at Home
This may seem like an easy decision, however you will need to wash your hair before blow drying. Utilize a smoothing shampoo and conditioner if your hair is thick or inclined to frizz, or strive for Voluminous if your hair is thin or flat.
Just apply conditioner to the ends and mid-lengths of your hair. On the off chance that you apply it to the roots, you hair will look flat and oily.
Utilize a wide-toothed comb to work out any tangles while the conditioner is in your hair. The conditioner will make it much less demanding and will minimize hair breakage.
2.) Towel-dry Your Hair to Straighten Hair at Home
When you venture out of the shower, wrap your hair in a retentive, microfiber towel and leave it for a moment or two. At that point unwrap your hair and utilize your towel to tender spot or smudge your hair to dispose of any over-abundance moisture.
Don’t rub your hair with a towel. This might cause your hair to break.
Remember that you are not trying to dry your hair with the towel, it should even now be truly damp when you’re finished towel drying.
3.) Comb out Any Tangles to Straighten Hair at Home
Use a wide-tooth comb or paddle brush to part and comb your hair. Make a point to be fragile because damp hair is particularly sensitive. Remember to work from the ends upwards, rather than beginning of the roots, as this will cause less breakage.
Describing your part while your hair is still wet will help it stay more usually after it’s been dried and straightened.
On the off chance that your hair is to a great degree tied, try spraying it with a de-tangling mist or a leave-in conditioner.
4.) Apply Product to Straighten Hair at Home
Apply a little measure of straightening serum or cream to the ends and mid-lengths of your hair and rub it back in. This will help to make your hair extra smooth and smooth in the wake of drying In case you’re agonizing over your hair falling flat or losing its shape, fog it with a light layer of hairspray, holding the can around six inches away from your head.
(C) Maintenance Tips to Straighten Hair at Home
1.) Avoid Water to Straighten Hair at Home
Avoid spraying water or adding mousse. The watery substance will cause your hair to twist back up or frizz quickly. Do utilize a hair spray on the off chance that you live in a humid region, notwithstanding. Your hair will be inclined to frizz because of the added moisture buzzing around.
2.) Keep an Umbrella to Straighten Hair at Home
Downpour will undiscovered all your diligent work and leave you with a frizzy wreckage. Additionally, remember to convey a headband with you in the mid year to keep the sweat from your bangs. In the event that you are running or strolling, consider putting your hair up in a pigtail.
3.) Curling Accessory to Straighten Hair at Home
Consider utilizing a hair curling accessory for adding unobtrusive twists or doing a cheeky flips. Regardless of the fact that you love the straight look, a hair curling accessory could be utilized to flick out the ends of your hair or flick the front sections away from your face.
4.) Washing Hair to Straighten Hair at Home
Understand that on the off chance that you wash your hair it will return to typical. Don’t stress, however, you should simply rehash the straightening process once more! Just don’t straighten your hair excessively, as it will cause your hair to wind up dry and harmed. Try to spare the straight look for uncommon events!
If you can find a straightening product which contains a heat protection segment, all the better.
Again, avoid applying these products to the hair roots, as they might damage your hair.
5.) Use a Good Hair Dryer to Straighten Hair at Home
A good hair dryer is key when you are trying to blow dry your hair straight. A powerful hair dryer can help you to straighten your hair in less amount of time. In case you need to place assets into an alternate hair dryer, there are a couple of things you should consider
Wattage. The wattage of a hair dryer is an indication of how powerfully air can flow. Saloons mostly use a hair dryer with a wattage of around 1800, however a wattage of 2000 may be imperative for thick or wavy hair. A hair dryer with high wattage is really good.
Pace and Temperature Controls. Having a hair dryer with adjustable paces and temperatures is a huge extra, as you will use various settings to achieve different styles. For example, a cool setting could be used to finish your hair with an effect of crisp air, which serves to set the style while adding shine.
Weight. The definite inverse thing you want is a staggering hair dryer which is going to tire out your arm when you’re just halfway through a blow dry. Look for a hair dryer which weighs short of what two pounds. The weight should be demonstrated on the compartment.
Associations. In case you are using a hair dryer to blow dry your hair straight, you will definitely need a nozzle association which centers the air flow and keeps hair from frizzing. Check to see if a nozzle association is fused with your hair dryer or in case it needs to be procured freely.
6.) Rough Dry Your Hair to Straighten Hair at Home
Turn your hair dryer on (for a quick and heat, if possible) and begin for the most part drying your hair. You can use your fingers to lift your hair and dry your hair roots without brushing it .
Ensure that the hair dryer is demonstrating downwards. Also, please ensure that the dryer should blow your hair down from the crown of the head, and not in another direction.
You should continue with barbarous drying your hair until it is around 60% to 80% dry, yet no more.
7.) Divide into Sections to Straighten Hair at Home
Differentiating your hair into sections before you finish blow drying is a good thought, as it will help you to focus on straightening one layer of hair at a time. Part your hair into three layers and use butterfly clips to divide your hair into a top, middle and end section.
On the off chance that you have bangs, leave them down and dry them in any case, before you dry the end part. Bangs dry up quickly and it becomes hard to separate, once dry.
8.) Use Right Hairbrush to Straighten Hair at Home
The type of hairbrush you utilize while blow drying your hair will have an effect on how your hair turns out. In the event that you want to add volume while you straighten, or add a slight twist or flick to the ends, utilize a thick round brush. However, in the event that you want poker-straight bolts, a paddle-brush is your best alternative.
9.) Right Blow Dry Technique to Straighten Hair at Home
Use the right technique to blow dry the hair straight. Take a section of hair somewhere around two and four inches wide and hold it taut with the help of a hair brush.
You additionally need to verify that you are running the air flow downwards – the nozzle of the hair dryer ought to be indicating towards the ends of the hair as you dry. This keeps the hair, fingernail skin down, providing for you a smoother, sleeker result.
When you have completely dried each one section of hair, finish it off with an impact of cool air to help set the style and add shine.
10.) Let Down on Required Sections to Straighten Hair at Home
When you have completely dried the bottom layer of hair, uproot the butterfly clip holding the middle layer. Dry this layer of hair utilizing the same technique as in the recent past. When the second layer is completely dry, let down the third and last layer and finish off your blow dry.
Once your hair is completely dry, it ought to look straight and smooth. In the event that it’s still a little wavy, you may need to dry it further, truly utilizing the brush to draw the hair straight.
Also, as a last resort, utilize a straightening irons to head over any especially persistent bits.
11.) Apply Finishing Product to Straighten Hair at Home
To set your style and give your hair a little extra shine and control, apply a pea-sized measure of finishing product to the ends and mid-lengths of your hair. Additionally a signing agent can also do the trick for you.

