Very few things date a space like a popcorn ceiling and not in a charming way. They are difficult to repair, hard to clean, and catch dust very easily; but despite all of these cons their popularity exploded in the late 1950s because they made easy work of finishing and hide imperfections. Popcorn ceiling is a quick and cheap way to finish sheetrock ceilings. Now they have fallen out of favor and consigned to the fate of mullets, feathered hair and Angels flight jacket. Getting rid of popcorn ceiling is pretty easy and it is also the good workout for your shoulder. You will read in this article the way to remove popcorn ceiling.
Ways to Remove Popcorn Ceiling:
1.) Hazard to Remove Popcorn Ceiling
There are two problems which you can face while removing ceiling.
- First is asbestos. Acoustic texture manufactured before 1980 may contain asbestos which should be tested before removing. It does pose a health risk if left in place but removing a ceiling containing asbestos can stir up the fibers and cause them to become trapped in your lungs.
- The second problem is painting a ceiling. It can make removing a popcorn ceiling much if the paint has been applied over the texture. This prevents the texture from absorbing water which is necessary to loosen the material. While a painted texture need to be removed, it usually requires the application of a chemical stripper to breakdown the paint barrier.
- To determine if these condtions applies to your ceiling, you need to combine a few drops of liquid dishwashing soap with warm water. Then pour it into a spray bottle, lightly spray a small spot in an inconspicuous location and wait for a few minutes for it to absorb the water. If the water will soak in the ceiling has been painted then the texture will come up easily.
2.) Preparation to Remove Popcorn Ceiling
You need to clear the room entirely. Suppose your floor is looking like what your ceiling looks like now. You can imagine that tiny little pellet of paint in every crack and cranny of your sofas, rugs and chair. It will not be a pretty sight. To avoid having to do more work later on, you need to remove any and all furniture or household items from the room completely. If should look completely bare before moving on to the next step.
3.) Cover the Floor
You need to completely cover the floor with a drop cloth or a plastic covering. You can use a canvas drop which is a professional gold standard. Or you can do this by using several pieces plastic, then overlap them to cover the area.
- Remember that any plastic covering which is not taped together has a chance of leaking. If you want to be sure that your clean up job will only require throwing away the plastic covering, tape it together for added protection.
- Put a fan in the room and turn it on for the added ventilation. Don’t turn it up toward the ceiling. Just have it on and blow in an inconspicuous place near the ground.
4.) Spray to Remove Popcorn Ceiling
You can use a garden portable hand sprayer to spray down portions of the wall to remove popcorn ceiling, it is also called a Hudson sprayer. Spray a 3’x 3’ area of the ceiling. Then let it soak for a minute and then spray it again. The popcorn material is very porous and dry, so it will easily soak in the water and you can spray on it.
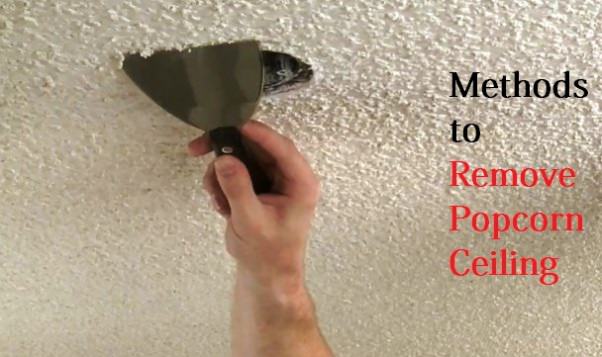
5.) Scrape to Remove Popcorn Ceiling
After a few minutes of spraying get up on a stepladder and scrape the popcorn off with a texture scraper. Don’t worry if you don’t have a ceiling texture scraper, you can use a large putty knife or drywall knife to scrape.
- If will come off very easily but if it is not coming then soak it some more. Be careful not to soak the ceiling too much. As too much water can cause damage to the drywall tape and underlying drywall that you will find behind the popcorn stubble.
- When using the ceiling texture scraper, attach the refuse bag to the scraper. Most of the scrapers come up with this functionality. In this way, you can throw the popcorn stubble from the catch right into the garbage instead of having to wipe it all up again on your floor.
6.) Repeat the process
When you will complete the first part to remove popcorn ceiling, then move onto the next 3’ x 3’ square of ceiling area then repeat the process of spraying and scraping.
- When you will completely scrape off the sand and the entire ceiling with the help of sanding pole and screen. Then gather any of the scraped off popcorn that is on the drop cloth and put it in a heavy-duty garbage bags. Finally, vacuum up any remaining dirt and debris.
7.) Apply Drymud to Remove Popcorn Ceiling
Apply any needed joint compound, if necessary. At this point, you will probably see that your ceiling has only been fired taped. That means the drywall installer only did a very crude job with the drywall tape, put up only one coat of mud. Be prepared to put on a couple of coats of drywall mud.
- For the best finish of all, you will need to a skim coat. A skim coat involves topping compound applied to the entire ceiling with a 12 to 14 drywall knife. Then sand this skim coat for a beautiful finish before applying primer and paint.
8.) Prime and Paint to Remove Popcorn Ceiling
Add more texture to your ceiling, if you want. So the popcorn finish didn’t work out for you at the end. There are lots of other texture finishes which you can try out on your ceiling to make it pop and better stand out.
- Then prime and paint your ceiling. Once you have mudded, sanded and textured, then it is a time to prime and paint. This is the fun part, giving you a beautiful new ceiling. The amount of work you will do definitely worth it.
9.) Cover with Drywall
Affix ceiling grade gypsum board rather than remove popcorn ceiling, which weights less than the standard wall board. Right over the existing popcorn ceiling. You will need to securely screw it into the framing and be proficient at muddying and for a seamless job.
- This is a better option than scraping if you have lead paint or asbestos because you can remove the harmful substance instead of sending it airbone. You will also get the smoothest possible finish if you will mud and tape properly. If the ceiling has damage or if you already need to cut it to reroute electrical or HVAC, you can make large cuts into the existing substrate without worrying about patching, they will be soon covered up.
10.) Skim Coat on a New Design
It is easy for a homeowner to do themselves. It is often found in older homes which are called pre popcorn ear as this method involves cleaning and prepping the existing substrate with quick set drywall mud. Applying a bonding agent like a joint compound with a trowel or knife to create a new texture.
- Many old house wants to recapture the history of the home and a smooth ceiling will not fit on their bill. The most important consideration is to make sure the substrate is structurally secure. Adding a wet product can create more weight on the ceiling than it can handle and cause it to come down. You might need to consult with a contractor before getting started.
Tips and Warning
Use heavy duty contractor bag to pick up all old popcorn material. If you will take a few large bags for each room, they will be will very. So get the whole box of the contractor bags before you start.
- Be carful while scraping around the edges of the ceiling because there will be drywall tape along these corners. You would like to keep this tape in a good condition.
- If you have a garden sprayer, so just bring in a garden hose with a sprayer valve on the end of it. just be careful with the sprayer attachment, that it doesn’t leak and soak water into your floors.
- If your house was built before the mid-70s, it is possible that your ceiling contain asbestos. So get the ceiling check before you start. If the ceiling does have asbestos in it, then it will be best to install ¼ drywall over the existing ceiling, since removing the asbestos would be out of your budget.
- Asbestos is the known carcinogen that causes asbestos mesothelioma cancer and the symptoms will appear after 5 to 50 years of inhaling it.
You can also have a look at ways to remove wallpaper.
